how to install jetpack, how to install jetpack plugin in WordPress, how to configure jetpack plugin on your site

Do you want to install and configure the Jetpack plugin in your WordPress but don’t know how?
If yes then you are in the right place because in this article we are going to give you step by step guide on how to install and configure the Jetpack plugin on your site.
Jetpack is among the most popular and complete tools for WordPress. It offers everything you need to build and secure your website in one package.
With Jetpack’s help Jetpack, it is possible to completely personalize your website with no-cost themes and image tools. It can also increase the number of visitors to your site by using automatic social sharing, similar content, and quicker loading speeds.
Jetpack also offers an enhanced, safer site through secure logins and protection against assaults using brute force. The core options are completely free. Advanced features such as regular backups and daily back-ups, as well as spam security, SEO tools, and daily backups can be included in paid plans.
How to install Jetpack?
Installation of Jetpack is done via your website’s WP Administration. To install Jetpack through the WP Administration:
- Go to the Plugins section and add a new plugin.
- Find Jetpack. The most recent version will appear listed in the results.
- Click to Install Now.
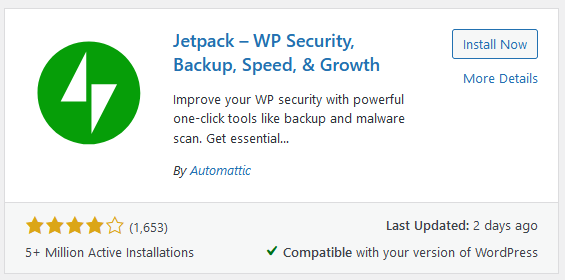
- Click to activate.
- After activating, you’ll be asked to set up Jetpack. Click on Set Up Jetpack.

- When you’re prompted When you are prompted, select “Approve” to link your website with WordPress.com. This is essential to utilize the Jetpack features.
After activating the plugin you will be asked to log in using your WordPress account or your google account.
After you log into your account and log in, you’ll see Jetpack’s different plan levels. Jetpack’s paid plans vary between $39 to $299 per year. Also, there is the option of a monthly subscription.
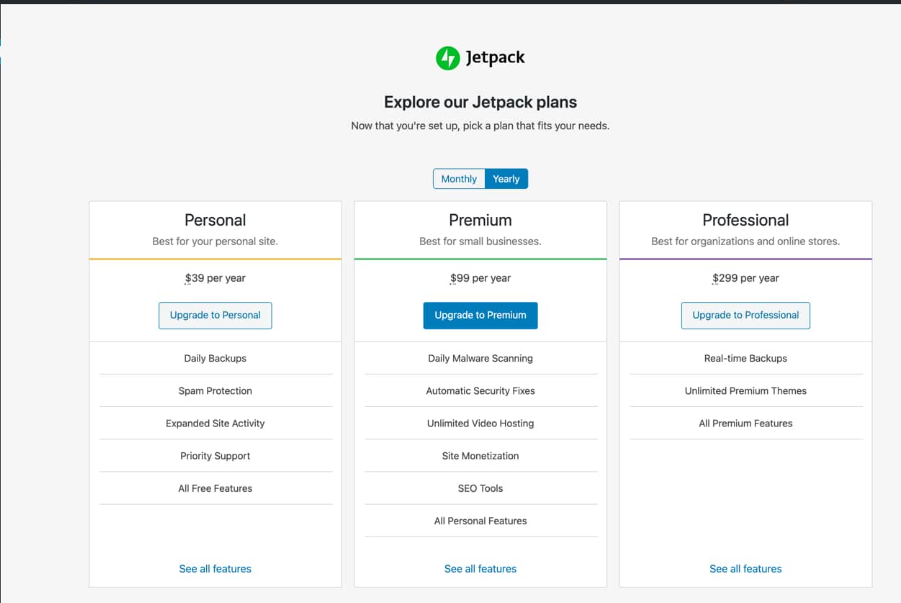
If you’d like to join the paid plan, please upgrade now. If not, scroll to the bottom and select the free option.
How to Configure Jetpack
Jetpack comes with three sidebar tabs including Dashboard, Settings along with Site Stats.
Let’s look at the steps to configure Jetpack for your website prior to reviewing our dashboards and statistics pages. Jetpack’s settings page has been divided into six tabs.
- Security Monitoring downtime and auto-updates, protection against brute force, and many more.
- Performance Search functionality as well as speed optimization and media offloading.
- Writing Slideshows with a full screen with support for Markdown/LaTeX, and more.
- Sharing Social sharing buttons, Like Buttons, and much more.
- Discussion Additional commenting capabilities as well as subscriptions and others.
- Traffic Ads associated posts, the short link generator sitemaps, and much more.
Jetpack Security Settings
With Jetpack, you can include backups, security, monitoring downtime, and other features to your WordPress website. Let’s look at Jetpack’s security options!
Secure Scanning and Backups (Paid Plans Only)
Jetpack’s “Backups and Security Scanning” feature is available only on paid plans. Each WordPress website must have a backup along with a security plan that is in use. Jetpack’s solution is an excellent alternative if your hosting provider doesn’t provide security scanning and backups.
Monitoring of Downtime
If you’re operating an important website that requires a delayed monitoring plan implementation is essential. In the end Jetpack’s downtime, monitor feature isn’t particularly customizable in terms of the monitoring process and the notification settings. As of now, Jetpack only supports sending notifications to your WordPress.com email address. There is no SMS, Slack, or phone support.

Brute Force Attack Protection
WordPress is the most well-known CMS around the globe and is an ideal target for hackers and other criminals. It’s not uncommon for WordPress endpoints such as /wp-login.php and xmlrpc.php to be flooded by bots that are designed to sabotage access to your credentials for login.

So, This jetpack plugin gives you protection against these types of cyber attacks on your website.
Jetpack Performance Settings
In 2022, ensuring that your WordPress website is loading fast is crucial for SEO and user experience. Jetpack has a number of options for performance-related features such as SEO, image optimization, CDN, and video hosting. Let’s look at the Jetpack performance options.
Speed and Performance
Jetpack’s “site accelerator” increases static and image file (JavaScript as well as CSS) loading times. The optimization feature for images alters the size of images based on an image’s tag width and height attributes. It can also compress images and convert them into WEBP formats to work with browsers that support it.
A static file optimization function caches JavaScript or CSS file types within Jetpack’s CDN. However, there’s a catch and it’s a significant one. As of now, Jetpack only caches static files within WordPress Core, Jetpack, and WooCommerce.
It isn’t able to serve JavaScript as well as CSS files that are generated by different plugins, or from the WordPress theme

Theme Enhancements
Jetpack allows you to include two theme enhancements on your website infinite scroll as well as an improved CSS customizable panel. Infinite scroll can replace your WordPress website’s pagination by using an AJAX-based loader which automatically downloads new posts, without having to load the following page.
Jetpack offers three options to use the infinite scroll option.
- Create more posts using the default behavior of the theme
- To load additional posts from the page by pressing a button
- More posts will be loaded as the reader scrolls down.
If you’re looking for a simple way to include infinite scrolling on your website, Jetpack may be a suitable alternative. Keep in mind that if opt for the third option it could be difficult for your visitors to access links, or click on content within your footer section of your website This is an issue we frequently encounter on WordPress sites that utilize infinite scrolling.
Enabling”Enhance CSS Customization Panel “Enhance CSS Customization Panel” option gives you a couple of additional options for WordPress’ CSS editor in Appearance > Customize Other CSS.
- Media Width If you’ve modified the size of the primary content area within CSS you must set the width here and also to ensure that the default size for images embeds is right.
- Get Started This option strips all of your template’s CSS styles completely. This option is helpful when you want to build CSS completely from scratch, but without having to alter the styles you already have. It also helps you reduce CSS overflow.
- Preprocessor – the upgraded CSS editor that supports the LESS as well as Sass (SCSS Syntax). This feature is helpful for those who prefer writing styles using LESS or Sass and offload CSS conversion to an application called a preprocessor.
So these are the methods that can help you install and configure Jetpack on your site.
NOTE:- There are a lot of other features also in the jetpack plugin but I have listed some of the most useful features of the Jetpack plugin which you can use on your site.
Conclusion
Jetpack is one of the widely used plugins of WordPress. Because it provides a lot of features for WordPress users like Site protection, increase website speed, etc. So, in this article I have listed some of the important features which you can set up while installing the Jetpack plugin.
So, I hope you like this article and if you have any problem please let us know in the comment section.
FAQ
1. Where do I find Jetpack in WordPress?
- Go to the Plugins section and add a new plugin.
- Find Jetpack. The most recent version will appear listed in the results.
- Click to Install Now.
- Click to activate.
2. Do I need Jetpack for my blog?
Utilizing Jetpack with WordPress is great as it can increase the number of visitors to your site after it discovers that your site is lacking in this area. Through the Publicize feature, it will automatically publish new blogs you post on your social media sites like Tumblr, Facebook, and Twitter.
3. How much is Jetpack WordPress cost?
Jetpack cost approx $99 a year.
Also Read: