Through this article, today we will learn how to easily set up Rank Math Instant Indexing, as it is the most crucial part of any website. Step-by-step process to set up the instant indexing plugin using Rank Math.
If you are building a website on WordPress, it depends on the setup of the Rank Math plugin and how quickly your article will rank. Everything relies on this.
If you haven’t created a website or blog yet, you can click here.
Now, let’s go through the step-by-step process to set up instant indexing using Rank Math. First, you need to create an API.
How to Create API
Step 1:-
First, you need to go to the Google Cloud Platform in your browser. You can also access it through the link provided below.
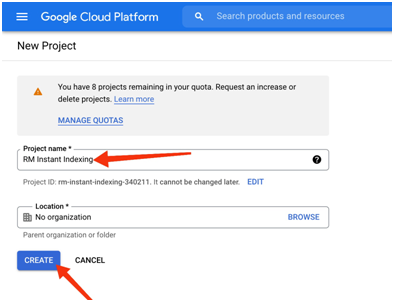
Click here. Now, a new page will open, where you need to click on “Create New Project.”

Step 2:-
Now, on the new screen that opens, you need to give your project a name, and it will also ask for a location, which you can leave empty. Now, click on “Create.” Your project has been created.
As soon as you create the project, an option to enable API indexing will appear. Now, click on “Next” for the “You are about to enable API indexing” option.
Next, on the side of Google Cloud Platform, you will see three lines. Click on it, and a menu will open. From there, click on the option “IAM & admin” and then on the “Service accounts” option.
Now, you need to select your created project.
After selecting the project, a new screen will open on your desktop or laptop, where “Create Service Account” will be displayed.
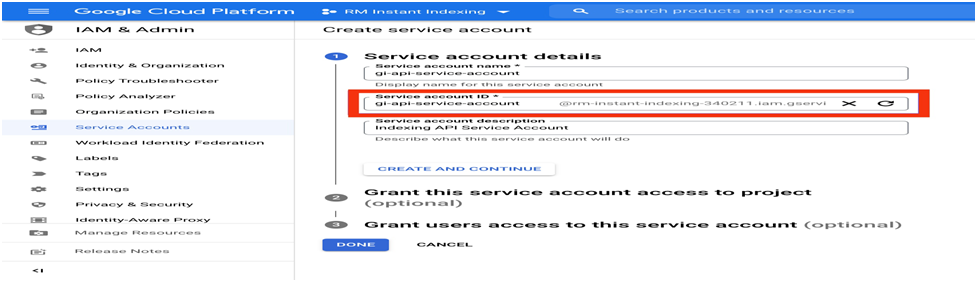
Here, you will need to fill in the information for your newly created service account.
After creating, your service account and its ID will be generated. Once you click “Create,” your ID will start generating, and it will be available for download and display on your screen after a moment. Make sure to copy it as you will need it later. After copying the ID, click on the “Done” option.
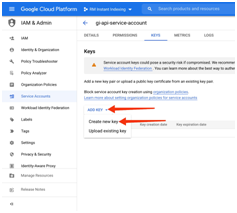
Now, you need to manage the key for your service account. To do this, click on the three long lines displayed on the page and select the “Actions” option.
Within the “Actions” option, click on “Manage Keys.”

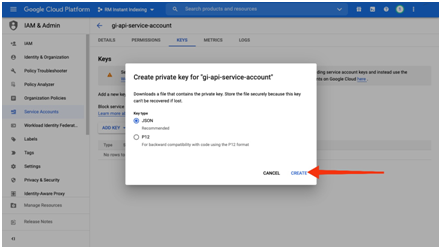
After this, you need to click on “Add Keys” and then click on “Create New Key.”
After clicking on “Create New Key,” select the JSON Key and click on “Create.” Upon clicking “Create,” the JSON file will be automatically downloaded.
How to Add an Owner to Google Search Console Panel
To add an owner to your Google Search Console panel, you need to register your website with Google Search Console and verify it.
To verify it, you’ll need to click on the link provided below and follow the steps outlined in an orderly manner.
[Link to Verification Process]
After verifying your website, click on the link provided below.
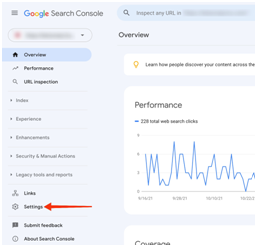
After clicking the link, select your website and click on the “Settings” option.
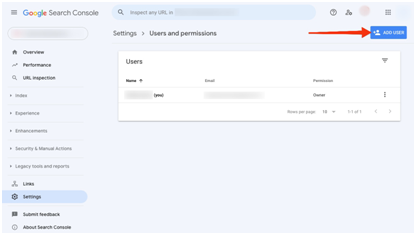
Afterwards, click on the “Users and Permissions” option. Now, you need to add a user to your Google Search Console panel. To do this, click on the “Add User” option.
Now, a new pop-up will appear on your screen, prompting you to enter an email ID and user name.
In the email ID field, you should enter the same email that you copied in the previous steps, and in the user name field, select the “Owner” option.
After filling in both of these, click on “Add.”
Now, you will notice that in your service account, “Owner” is displayed in the user name.
Installing Rank Math:
First, you need to access your WordPress dashboard. On the left side, you will see an option called “Plugins.” Click on that option.
When a new page opens, you will see “Add New” next to Plugins. Click on it.
Now, on the right side of the screen, you will see a search plugins option. In that, type “Instant Indexing” and search for it.
In the search results, you will find the Instant Indexing plugin as the top result. Install it. After installing, you will see “Activate.” Click on it to activate the plugin.
After installation and activation, you will find an option for Rank Math on the left side of the WordPress dashboard.
When you click on Rank Math, a new page will open, and you will see “Connect Your Account” written. Click on it, and then log in with the same email you used to create your website.
A new screen will appear in front of you, showing the option “OK, Activate Now.” Click on it.
Now, Rank Math’s dashboard has opened in front of you, where you have Easy, Advanced, and Custom modes. Click on “Advanced,” then click on “Start Wizard.”
From here, the setup process for Rank Math on your website begins.
Now, you have successfully completed the setup process for Rank Math on your website. Whenever you publish a post, it will be indexed on Google within 20-30 minutes.
Read More
SEO क्या है? और अपने ब्लॉग का SEO कैसे करें?